Thread figures
What do you need:- Small wooden board
- Small nails
- Hammer
- Wool
- Ruler
- Glue
© Copyright crafts.knutselidee.eu
 Take a board and draw a figure on it. This can be a circle or a square or a genuine figure. You can find some examples on this page. Draw small dots on a regular distance along the figure.
 This really has to be on a regular distance otherwise you will not get a nice thread figure in the end. Use the ruler to measure exactly the distance between the dots. Hammer a nail on each of the dots.
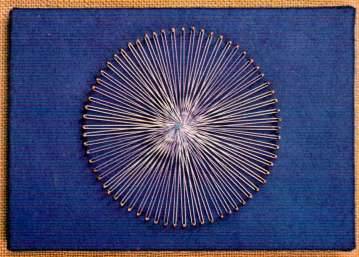
Once this is done you can start creating a figure using the wool. Tie one wool end to the first nail and span the wool from one nail to the other. You can do this in multiple ways which makes it very exciting to see how your figure is going to look like eventually.
 Usually you span from one nail all the way to the opposite nail, then you go one nail to the left (or to the right) and all the way back, again one nail to the left or to the right (see the example of the circle). You can also start from one nail and go to each of the nails on the other side of e.g. a triangle or square. You then obtain nice edges because multiple threads go over each other. You can see this very well in the figure below.
 You can create such figures in multiple ways. Also using multiple colors of thread. The nicest is to just experiment and if you dont like it, you just remove the thread again.

Hint
- It is nice to create e.g. the same 3 patterns on the board and span the threads differently each time.
© Knutselwerkje van crafts.knutselidee.eu


